端午节,没有出去玩,在家也无聊,就去外面找个咖啡厅坐着,折腾一下之前纠结了很久的事情,就是用文档软件作为hexo的后端,实现在软件上发文同步到博客。
我不太懂代码,网上好多教程,但是我都看不懂,所幸现在的ai功能强大,所以大部分代码都是ai来写的。(你遇到问题之后可以把代码丢给ai,让ai帮你修改成你能使用的版本)
这篇文章就是我第一篇正式用notion来写的,感觉还可以,确实挺不错的。
一、Notion上的设置
1.注册notion的 integrations
我把名字设置成hexo 注册完之后进入设置 把 ntn_开头的复制下来 这是NOTION_TOKEN
2.设置notion的数据库
数据库的表上设置以下项目 左边是名称 右边是类型
| title |
text |
| date |
date |
| tags |
multi select |
| categories |
select |
| publised |
|
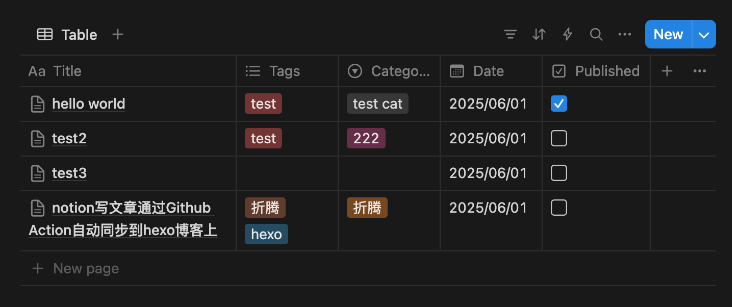
设置完之后就是上面这样。
接下来 进入到这个表格(数据库)里点击右上角三个点 connect到刚刚设置的hexo integrations
在右上角share里确保页面都是公开的,然后把链接复制下来
https://shelled-lycra-402.notion.site/205dec0a530780ceb816f49ea993f628?v=205dec0a5307805bba60000c35598268&source=copy_link
第一个就是数据库id 把数据库ID复制下来(这里很容易搞错)是32位的
205dec0xxxxxxx
到这里我们获取到两个东西
1.NOTION_TOKEN: ntn_xxxxxxx
2.DATABASE_ID:205decxxxxxx
3.写文章
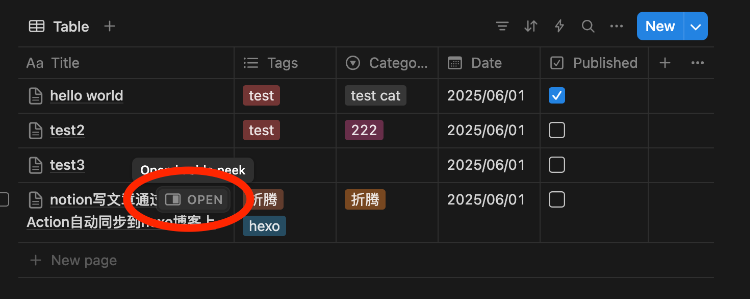
在这个数据库下面新建一列 按照对应的输入文章标题、日期、分类等等。然后title下面文章的名字点进去,就可以编辑里面的内容了,编辑完之后点publised下面的复选框,变成勾之后就可以被抓取了。
二、接下来就是hexo目录下的的设置
1.新建sync.js文件夹到hexo根目录下
1
2
3
4
5
6
7
8
9
10
11
12
13
14
15
16
17
18
19
20
21
22
23
24
25
26
27
28
29
30
31
32
33
34
35
36
37
38
39
40
41
42
43
44
45
46
47
48
49
50
51
52
53
54
55
56
57
58
59
60
61
62
63
64
65
66
67
68
69
70
71
72
73
74
75
76
77
78
79
80
81
82
83
84
85
86
87
88
89
90
91
92
93
94
95
96
97
98
99
100
101
102
103
104
105
106
107
108
109
110
111
112
113
114
115
116
117
118
119
120
121
122
123
124
125
126
127
128
129
130
131
132
133
134
135
136
137
138
139
140
141
142
143
144
145
146
147
148
149
150
151
152
153
154
155
156
157
158
159
160
161
162
163
164
165
166
167
168
169
170
171
172
173
174
175
176
177
178
179
180
181
182
183
184
185
186
187
188
189
190
191
192
193
194
195
196
197
198
199
200
201
202
203
204
205
206
207
208
209
210
211
212
213
214
215
216
217
218
219
220
221
222
223
224
225
226
227
228
229
230
231
232
233
234
235
236
237
238
239
240
241
242
243
244
245
246
247
248
249
250
251
252
253
| const { Client } = require('@notionhq/client');
const fs = require('fs');
const path = require('path');
const https = require('https');
const { mkdirp } = require('mkdirp');
function generateSafeFileName(name) {
return name.replace(/[^a-zA-Z0-9\u4e00-\u9fa5._-]/g, '-');
}
function formatDate(date) {
const year = date.getFullYear();
const month = String(date.getMonth() + 1).padStart(2, '0');
const day = String(date.getDate()).padStart(2, '0');
return `${year}-${month}-${day}`;
}
const notion = new Client({
auth: process.env.NOTION_TOKEN,
notionVersion: '2022-06-28'
});
const imageCounter = new Map();
async function syncNotionToHexo() {
try {
const response = await notion.databases.query({
database_id: process.env.NOTION_DATABASE_ID,
filter: {
property: 'Published',
checkbox: {
equals: true
}
}
});
if (!response.results || response.results.length === 0) {
console.log('没有找到已发布的文章');
return;
}
for (const post of response.results) {
try {
const title = post.properties.Title?.title[0]?.plain_text || 'Untitled';
const dateObj = post.properties.Date?.date?.start
? new Date(post.properties.Date.date.start)
: new Date();
const formattedDate = formatDate(dateObj);
const dateString = dateObj.toLocaleString('sv-SE', { timeZone: 'Asia/Shanghai' }).replace(' ', 'T');
const tags = extractTags(post);
const categories = extractCategories(post);
const safeTitle = generateSafeFileName(title);
const fileName = `${formattedDate}-${safeTitle}.md`;
const postDirName = `${formattedDate}-${safeTitle}`;
const postDir = path.join('source/_posts', postDirName);
const filePath = path.join('source/_posts', fileName);
imageCounter.set(post.id, 1);
await mkdirp(postDir);
const blocks = await notion.blocks.children.list({
block_id: post.id
});
let content = `---
title: "${title}"
date: ${dateString}
tags: ${formatTagsOrCategories(tags)}
categories: ${formatTagsOrCategories(categories)}
---\n\n`;
for (const block of blocks.results) {
if (block.type === 'paragraph') {
content += block.paragraph.rich_text.map(t => t.plain_text).join('') + '\n\n';
} else if (block.type === 'heading_1') {
content += `# ${block.heading_1.rich_text.map(t => t.plain_text).join('')}\n\n`;
} else if (block.type === 'heading_2') {
content += `## ${block.heading_2.rich_text.map(t => t.plain_text).join('')}\n\n`;
} else if (block.type === 'heading_3') {
content += `### ${block.heading_3.rich_text.map(t => t.plain_text).join('')}\n\n`;
} else if (block.type === 'bulleted_list_item') {
content += `- ${block.bulleted_list_item.rich_text.map(t => t.plain_text).join('')}\n`;
} else if (block.type === 'numbered_list_item') {
content += `1. ${block.numbered_list_item.rich_text.map(t => t.plain_text).join('')}\n`;
} else if (block.type === 'image') {
const imageUrl = getImageUrl(block);
if (imageUrl) {
const imageNum = imageCounter.get(post.id);
imageCounter.set(post.id, imageNum + 1);
const ext = path.extname(imageUrl.split('?')[0]) || '.jpg';
const imageName = `img${formattedDate}-${imageNum.toString().padStart(3, '0')}${ext}`;
await downloadImage(imageUrl, postDir, imageName);
const captionText = (block.image.caption || [])
.map(t => t.plain_text)
.join('');
let customStyle = '';
const sizeMatch = captionText.match(/size\s*=\s*(\d+)%/i);
if (sizeMatch) {
customStyle += `width: ${sizeMatch[1]}%; height: auto;`;
} else {
customStyle += `max-width: 100%; height: auto;`;
}
if (/center/i.test(captionText)) {
customStyle += ` display: block; margin: 1rem auto;`;
} else if (/left/i.test(captionText)) {
customStyle += ` display: block; margin: 1rem 0 1rem 0;`;
} else if (/right/i.test(captionText)) {
customStyle += ` display: block; margin: 1rem 0 1rem auto;`;
} else {
customStyle += ` display: block; margin: 1rem auto;`;
}
content += `<img src="${postDirName}/${imageName}" alt="${imageName}" style="${customStyle}" />\n\n`;
}
}
else if (block.type === 'code') {
const codeBlock = block.code;
const language = codeBlock.language || '';
const codeContent = codeBlock.rich_text.map(t => t.plain_text).join('');
content += `\`\`\`${language}\n${codeContent}\n\`\`\`\n\n`;
}
}
fs.writeFileSync(filePath, content, 'utf8');
console.log(`成功生成: ${fileName} (目录: ${postDirName})`);
} catch (error) {
console.error(`处理文章时出错: ${error.message}`);
}
}
} catch (error) {
console.error(`同步失败: ${error.message}`);
process.exit(1);
}
}
function getImageUrl(block) {
if (!block.image) return null;
if (block.image.type === 'external') {
return block.image.external.url;
} else if (block.image.type === 'file') {
return block.image.file.url;
}
return null;
}
async function downloadImage(url, dir, fileName) {
return new Promise((resolve, reject) => {
const filePath = path.join(dir, fileName);
const file = fs.createWriteStream(filePath);
https.get(url, response => {
if (response.statusCode !== 200) {
reject(new Error(`下载图片失败,状态码: ${response.statusCode}`));
return;
}
response.pipe(file);
file.on('finish', () => {
file.close();
resolve(fileName);
});
}).on('error', error => {
fs.unlink(filePath, () => {});
reject(error);
});
});
}
function extractTags(post) {
const tagProperty = post.properties.Tags;
if (!tagProperty || tagProperty.type !== 'multi_select') {
return [];
}
return tagProperty.multi_select.map(option => option.name);
}
function extractCategories(post) {
const categoryProperty = post.properties.Categories;
if (!categoryProperty || categoryProperty.type !== 'select') {
return [];
}
return categoryProperty.select ? [categoryProperty.select.name] : [];
}
function formatTagsOrCategories(items) {
if (!items || items.length === 0) {
return '[]';
}
if (items.length === 1) {
return `[${items[0]}]`;
}
return '[' + items.map(item => `"${item}"`).join(', ') + ']';
}
function getImageDisplaySize(block) {
if (!block.image || !block.format) return null;
const widthRatio = block.format?.block_width;
if (widthRatio) {
const baseWidth = 800;
return {
width: Math.round(baseWidth * widthRatio),
};
}
return null;
}
syncNotionToHexo();
|
把这个方到博客的目录下。
2.然后新建一个.env文件
1
2
3
| NOTION_TOKEN=ntn_xxxx 替换成你的TOKEN
NOTION_DATABASE_ID=205dxxxxxxxx 替换成你的数据库ID
POST_PATH=source/_posts
|
然后在目录下执行
1
2
3
4
5
6
|
export NOTION_TOKEN=ntn_xxxx
export NOTION_DATABASE_ID=xxxxx
node sync.js
|
就能看到从ntoion拉取的文章了,到这里.js就配置完成了
我这个.js的逻辑是 把文章拉取下来之后 会把文章的图片放到同名文件夹下。
1
2
| /hello_world.md
/hello_world/img1.jpg
|
三、Github action设置
1.在.github/worlkflows/新建文件.sync.yml
1
2
3
4
5
6
7
8
9
10
11
12
13
14
15
16
17
18
19
20
21
22
23
24
25
26
27
28
29
30
31
32
33
34
35
36
37
38
39
40
41
42
43
44
45
46
47
48
49
50
51
52
53
| name: "Notion to Hexo Sync"
on:
schedule:
- cron: "0 * * * *" # 每小时运行
workflow_dispatch: # 允许手动触发
jobs:
deploy:
runs-on: ubuntu-latest
steps:
# 步骤1:检出代码
- name: Checkout
uses: actions/checkout@v3
with:
ref: "main" # 你的源码分支
# 步骤2:设置Node.js
- name: Setup Node
uses: actions/setup-node@v3
with:
node-version: "18"
# 步骤3:安装依赖
- name: Install Dependencies
run: |
npm install -g hexo-cli
npm install
npm install @notionhq/client
npm install mkdirp
# 步骤4:同步Notion
- name: Sync from Notion
run: node sync.js
env:
NOTION_TOKEN: ${{ secrets.NOTION_TOKEN }}
NOTION_DATABASE_ID: ${{ secrets.NOTION_DATABASE_ID }}
# 步骤5:生成静态文件
- name: Generate Site
run: |
hexo clean
hexo generate
# 步骤6:部署到GitHub Pages
- name: Deploy to Pages
uses: peaceiris/actions-gh-pages@v3
with:
github_token: ${{ secrets.GITHUB_TOKEN }}
publish_dir: ./public
publish_branch: pages # 你的发布分支
|
这里你需要确认仓库的分支,和发布的分支名字。
如果运行不成功的话 你可以直接从github网页端新建这个文件,把代码复制进去避免编码错误。
2.depoly设置
1.depoly涉及很多情况
- 在同一个仓库的不同分支,例如main分支用来存放源码,pages分支用来发布页面,这样的话就是用原来代码 配合GITHUB_TOKEN来发布。
- 源码和页面在两个不同的仓库,在hexo仓库存放源码,然后在另外一个仓库 xxx.github.io上发布我的页面,这样就适合直接用ssh来发布。
无论什么情况 你只需要把action的配置代码 sync.yml 复制给ai 把你的情况描述,跟着做就会成功的。
2.配置新的sshkey
ssh的配置hexo博客的时候都已经使用过了,而且涉及我自己的key所以就不放出来了,我遇到的坑就是ssh是已经使用过的 所以需要重新配置一个ssh
1
| ssh-keygen -t ed25519 -C "your_email@example.com" -f github-deploy-key-new
|
- 将新公钥添加到目标仓库:
- 将新私钥添加到源仓库的 Secrets:
3.根据你生成 SSH 密钥时的输出,公钥和私钥已分别保存到以下文件中:
- 私钥:
github-deploy-key-new(此文件包含你的私人密钥,请勿分享)
- 公钥:
github-deploy-key-new.pub(此文件包含你的公共密钥,可以安全地分享)
4.如何找到这些文件
** 在命令行中查看**
如果你是在 Linux、macOS 或 Windows 的 WSL 环境中生成的密钥,可以使用以下命令查看:
1
2
3
4
5
|
cat github-deploy-key-new
cat github-deploy-key-new.pub
|
在文件资源管理器中查看
- Windows:通常位于你的用户目录(例如
C:\Users\你的用户名\github-deploy-key-new.pub)
- Linux/macOS:通常位于你的主目录(例如
/home/你的用户名/github-deploy-key-new.pub)
如果不会的话设置完以后在github action上手动拉取一次 之后报错的内容复制给ai让ai帮你。
3.启动github action
进入仓库之后点击actions
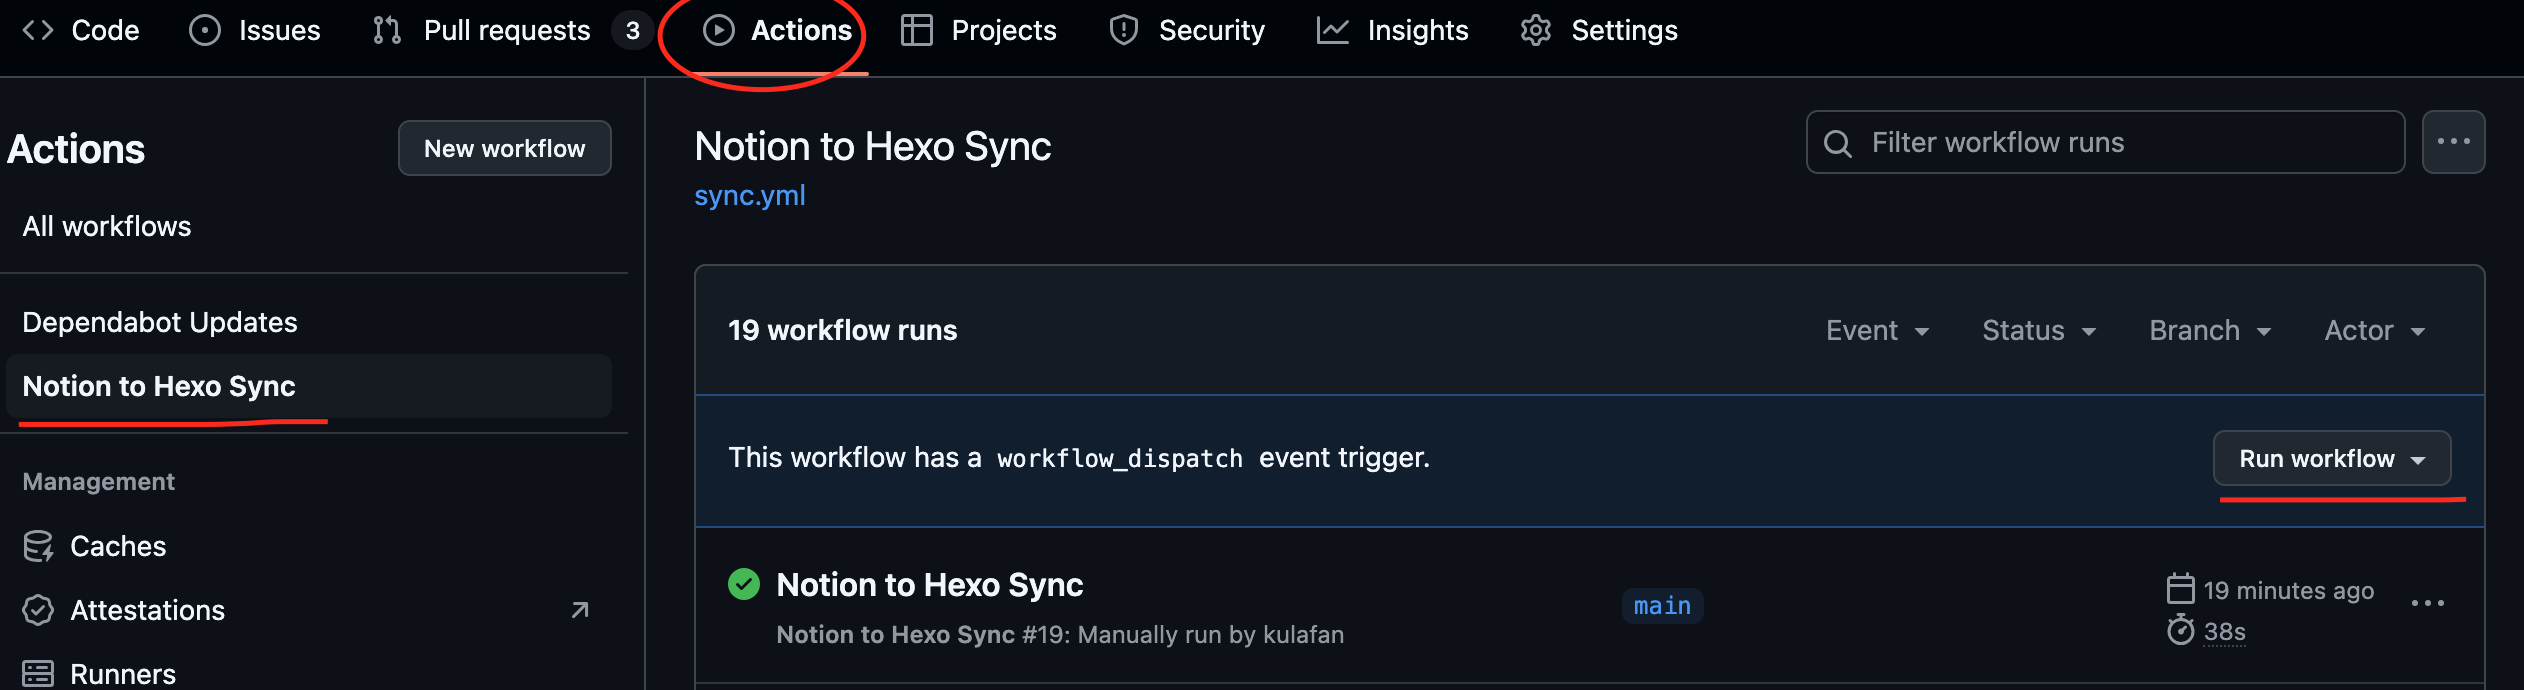
部署完之后应该就OK了我设置的代码是一小时抓去一次
我自己也不太懂代码 完全是跟着ai的提示完成的
四、我配置的时候遇到的坑
1.不会设置数据库的格式,问了ai好多次才明白
2.抓取的时候可以在本地测试sync.js的代码 成功了再上传到githubaction,可以省很多时间
3.deploy的时候用的ssh已经被使用了,但是我不知道,浪费了很多时间。
4.这个方式并不会把notion的文件保存到仓库里,而是每次都会重新抓取一次,我一开始以为是ai没把代码写好,后面才意识到,这样子更方便对文件进行管理,因为你想取消发布的文章可以把published的勾取消,而且每次对文章内容的修改都能同步到网页上,这样更加像后台。
五、内容更新
2025.07.13 修复了图片无法缩放的问题,添加了代码,可以抓取notion图片下caption的信息,例如在图片caption中输入”size=70% center”就能抓取文件的缩放信息,在文章里缩小到70%
2025.07.14 修复了时间显示的问题